Saturday, December 18, 2021

Wights

 Greetings and welcome to my contribution to Deadcember! Me friend left his game board at my house so I thought I would utilize his graveyard for the group shot of my freshly painted Wights.

Now on to the individual shots. I have to state that these guys where extremely hard to get decent pictures of. I’m blaming: 1) I’m not great at taking pictures to begin with. 2) the natural sunlight combined with the Nihilakh Oxide Citadel paint and pure white highlights. The camera had a hard time focusing on especially the faces. I may try taking pics again with artificial light to see if that is better. 

Ok, enough excuses, on to the miniatures themselves.

First up I've got a Citadel Lord of the Rings Barrow Wight B from ME-73.

                                                       front               


                                                       back                  


Next up is a Marauder Wight B from the MM51 Undead Characters.

                                                      front

                                                      back

Last up is another Wight from the MM-51 series this time Wight A
                                                   
                                                      front


                                                      back

The Marauder Wights actually have Marauder shields thanks to a generous friend who gave me a sprue of old Marauder shields a while back. 

On to the painting. The ghostly parts were primed white then painted with GW Nihilakh Oxide and edge highlighted with Vallejo Pure White. This was the first time I used the Nihilakh Oxide and it turned out pretty descent in real life, the pictures just don't do it justice. It has a real nice glow effect. These miniatures represent a transitional period were I started getting into using glazes. The armor was base coated with black then painted with Army Painter Plate Mail Metal and highlighted with Army Painter Shining Silver (I know a lot of people poopoo on Army Painter paints but their metallic paints have the best viscosity for my style, and you gots to roll with what works for you). When the metal was dry I glazed it with brown and black inks to try and give it a rusty look. The purple spot color was Vallejo Model Color Blue Violet glazed with Vallejo Game Color Hexed Lichen for the medium shades, then some violet ink glazed into the deep shadows. The gloves on A and B were painted with P3 Boot Strap Leather glazed with GW Agrax Earth Sade. The pouch on B and the shaft on A's polearm shaft were base coated in P3 'Jack Bone and then glazed with P3 Boot Strap Leather. 
I plan on trying to keep up with this "how I painted this miniature" thing for as long as I can. I like it when I've seen it in other blogs, at least for me it is inspirational. But sometimes in the heat of wet pallet painting it may be hard to recall what colors did what. 

Thanks again for stopping by. Be strange but don't be a stranger!

Monday, December 6, 2021

Tutorial: 28mm doors


 I figured I’d show y’all how I make doors:
I use card stock that comes from cereal or beer boxes.


 First I like to cut a strip that’s 1” wide. Then I chop into a rectangle, I believe this is 1” by 1 3/4”. Then I cut up some 1/8” ish strips:


You want to make a ton of these because they’ll be the vertical planking for the doors.


I chop the 1/8ish strips to where they are about the same height as the door.


Then I take a shitty dollar store brush and smear glue on the strip.


Then I glue them down in vertical fashion, leaving enough room between strips for paint/washes to go.
 

When I wind up with a few, I put them in a press I came up with to keep them flat while they’re drying. The press is two pieces of laminated MDF and two dollar store clamps (clothes pins would work too).


After they’ve dried for a couple of days, I chop the vertical parts off to be even with the rectangle door and make some cross braces.


Glue the braces on horizontal and embellish them with some rivets and a handle. Rivets are tiny beads from Dollar Tree and the handle is from a cheap jewelry making kit from Hobby Lobby.


Attach it to a building.


Frame it in.


Then you’re done!


Saturday, November 6, 2021

Gladius

A lone surviving member of a small group of soldiers that out maneuvered and held off an invading army 3000 times their size?

Child of the Norsca, sold into slavery then trained to be a successful pit fighter, destined to wear a jeweled crown upon his troubled brow? 

A disgraced Legionary General from Estalia destine to change Tilea from inside the Arena?


Who knows. Who cares. He’s a bad ass with rippling muscles, a sharp sword and a giant mowhawk.


The miniature itself is Gladius from Citadel’s 1986 box set BC7 Heroic Fighters of the Known World, sculpted Jes Goodwin.

I went with a classic red for his color. It looks orange in these pictures but mellowed out significantly after a couple of coats of clear. This sculpt really shows off my love for inks. I added a couple of mushrooms to the base for some real old school flavor. They are painted with Vallejo fluorescents so they glow nicely under a black light!
One of the neat little details on this guy is that Jes sculpted a big comb, obviously for his big mowhawk, on his right hip. I painted it brass and it can be seen in the second picture here.
I have a couple other figures from this box set and plan on collecting them all. Ain’t this hobby great?

Friday, October 22, 2021

Tutorial: 28mm shingles


If you are getting to be my age you might have to worry about Shingles if you had chickenpox as a kid…wait let me start over. If you’re not a Millennial then you’re probably a home owner and have to deal with a contractor to reroof your house. Na, this ain’t about any of that. This is about fake roofs and shingles. Mostly  shingles. I like to go with individual shingles as opposed the strip method. I feel like I get a more dynamic model from individual shingles.

I make them 1cm by 1.5 cm. Yes, it’s metric and it’s “too big” for 25mm, 28mm and even 32mm (scale creep!) scale, but it’s a good working size and looks good on my buildings. And that’s the most important thing. How it looks to me! 

I start out by making a sub-roof.

Made of the same card stock (cereal or beer boxes) as the shingles themselves. Add some triangle supports made of foamcore and as the Brits say, Bob’s your uncle.  

I have found that it’s beneficial if I prep the shingles before I start the row. From left to right: one that has the left hand corner chopped, shingles that are cut in half, unmodified shingles and ones that have the right hand corner chopped.


You’ll need some of the half shingles to stagger the rows like this: 

I like to glue them on in a horizontal fashion. Putting the glue a little bit higher than it needs to be and dragging it down with each individual shingle. That way I can position each one as I like leaving 1mm to 1.5mm between each shingle but I have to work fast as I like Gorilla Wood Glue, and it sets up quick.

When it’s all glued together it looks like this:


Then after it’s painted:


There you go. Fantasy roofing 101. Now why don’t you go for it! Build something and show me what you got!


Friday, June 11, 2021

Townsfolk

These are the first eight townsfolk.


Jerauld Jonesy, barkeep and owner of The Quiet Woman.


Bethany Jonesy, serves lager and staff manager at The Quiet Woman.


Bridgett, serving girl at The Quiet Woman.


Porthos Broulet, Bretonnian and chef at The Quiet Woman.


Farmer Ted, one of the locals. He’s a farmer that works on a farm.


And lastly, a couple of local ne’er do wells.
Lawrence the footpad.


Carson the cutthroat.


Theodore, scroll caddy and one of the wizard Azogorim’s minions.


I didn’t get into their backgrounds and motivations in detail here. That will be left for the scenarios and for the player characters to find out!

Wednesday, June 9, 2021

Pilch Warpspittle

Pilch Warpspittle started life as an Elven prince. Spoiled rotten with every whim and desire catered to, his debauchery knew no bounds. His lifestyle should have pointed him into Slaanesh’s embrace but in an ironic twist of fate, Papa Nurgle blessed Pilch with an incredibly potent venereal disease. With his manhood (elfhood?) no longer working correctly, Pilch prayed to every god he could think of for relief. When he got to Nurgle, Father bellowed and his children chittered with laughter…

I have to admit that I wasn’t a big fan of this sculpt back in the day. I changed my mind over the last couple years as I’ve seen some very nicely painted versions online. This guy was very intense to paint as he is filled tons of tiny details and my eyes just aren’t what they used to be. Getting older is a bitch.

I did use him as an opportunity to experiment with a few things. The first is that I used some burnt sienna ink on the bone part. Next I played with color theory and mixed olive green with a purplish red to make a reddish brown for the shading on the cloak. I think it turned out well. Also used static grass for the first time.
Not sure yet if I’ll as a champion, warrior or give him some magic power befitting his pointing finger.
Thanks for checking in, see ya later.

Sunday, June 6, 2021

Archaic Abodes 5

 Ok so I haven’t made a blog post in awhile...I’m really bad at this 🙄. I have noticed that many of the Oldhammer guys that used to have active blogs have been slowing down lately. I’m definitely not the only one who has noticed this. Oldhammer staple Golgfag has posted about this trend not only on his blog https://golgfags.blogspot.com/2017/12/is-oldhammer-dying.html?m=1 but also on the Oldhammer forum. http://forum.oldhammer.org.uk/viewtopic.php?f=6&t=28019

One of the things that is probably drawing people away from blogs is the allure of social media. Facebook might be more convenient but it has way too much drama for me. While I may not be good at updating my own blog, I do plan on carrying the torch and doing my part to keep this kind of thing going. Drama free! 

All that being said, I don’t want it to sound like I’m getting a big head or putting myself on some sort of pedestal. I’m just some old school guy, doing his own thing and blogging about it. Really at this point, I’m probably just talking to myself anyway. I don’t have any followers and no one has commented on any of my posts. Whatever.

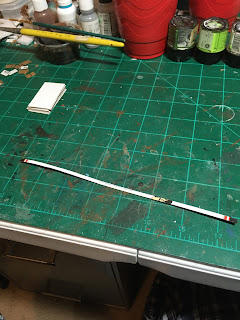
My buddy is making a table and I offered to help. He is on a deadline and was starting to feel a bit overwhelmed. I took on some of the smaller, generic pieces. He didn’t assign me anything that would give away any plot points as it is a themed board built around a campaign and I’ll be a player character this time. The first two are bridges. He requested a stone one and a rickety type wood one.

I took influence for the stone bridge from the ones in Brian Ansell’s collection. http://realmofchaos80s.blogspot.com/2017/08/marcus-ansells-meritorious-posting-of.html?m=1

I used foam board, corrugated cardboard, card stock, sand, drywall compound, Mod Podge and craft paint. The balls on top of the pillars are beads I liberated from my daughter. I hope she doesn’t read this...I’m probably going to be in trouble!

I painted the road part grey at first and hated it. It looked weird. But on the flip side, I’m not totally sold on the brown. Six of one, half dozen of the other I guess.

To me at least it has a Dave Andrews feel to it. Nice and old school stylee.


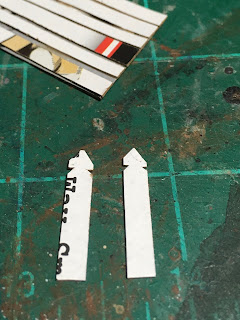
The wood bridge has more of mid to late’90s GW feel to it with the skulls and spikes. My buddy’s board is undead/Halloween themed so it is fitting. He said it was perfect and better than he would have imagined. He’s happy, I’m happy.


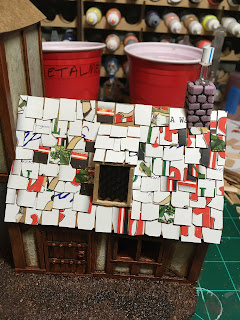
Build with two different size craft sticks from the Dollar Tree, Gorilla wood glue, craft paint  and skulls and spears from Warlord Games plastic skelingtons box.


Not too bad for a bunch of crap glued together and painted. It looks bigger than the stone bridge but they are actually very close to the same size.

I also made some hedges. This time for my table that I haven’t built yet!


Made with green scrubby pads (once again from Dollar Tree) cut to the length of a craft stick. Approximately 110mm. Then cut into strips of 40mm. The strip was then folded over and hot glued together making a 20mm high hedge. This was then hot glued to a craft stick for a base. Sand was glued to the side of the craft stick to hide it. The green part was painted with wood glue mixed with a little brown paint. Then Blended Tuft green blend by JTT Scenery Products was applied when the glue was still wet. The sand was then painted brown. Baboom babam, done!

Once again, thanks for stopping by and checking out my blog. Be strange but don’t be a stranger!


Gaslands terrain

 I like to pop into my local dollar store every now and then to see if there is anything new that I can use gaming projects. Some crap found...