Saturday, March 4, 2023

More Grenadier Goodness

 Back again with another classic Grenadier. She is Half Elf Maid with Sword (6007j) from the Fantasy Lords box set, Dungeon Raiders 6007. Sculpted by Andrew Chernack.

She came to me through a friend that found a box of miniatures at a flea market. Said box contained a few vintage Citadel, but was mostly Grenadier and Ral Partha. A great lead haul and a great gift from great friends! It really sparked my interest in the old Grenadier miniatures.


Her shirt and shield unicorn were based with Vallejo 70.942 Light Green, washed with green ink, highlighted with the Light Green and then a second highlight with some bleached bone mixed in. The boots and pants were based with Vallejo 72.038 Scrofulous Brown. The boots were shaded with a burnt sienna wash, the pants received 72.034 Bonewhite highlights. For the belt and back ribbon I used 70.811 Blue Violet as the base, shaded with violet ink, highlights with the Blue Violet, then second highlight with some Bonewhite mixed in. Her skin is 70.815 Basic Skin Tone shaded with Reikland flesh shade.

All in all a fun miniature to paint with cool dynamic pose. I left the top of her integral base exposed and sculpted some flag stones into it with a thin layer of green stuff. They didn’t really come out in the pictures. If I was to do it again I would probably paint the shield unicorn with the Blue Violet. There are a couple of things I missed, namely her earring and some details on the belt. 25mm scale plus these old eyes just aren’t what they used to be. I might be trying a magnifying glass in the future.

Thanks for stopping in and checking out my blog… I've got some more stuff I’ll be posting up soon.

Sunday, February 26, 2023

Grenadier Clerics


What is this lunacy? Nothing for months then two posts within a week? If anything, I’m erratic. Anyway, let’s get to it.

What we have here are two Clerics from Grenadier Julie Guthrie’s Personalities. They are from my friend’s collection, purchased in blister back in the day from what was then our local game shop: Newton Hobby Center.
 They were originally supposed to be painted as a commission but he has so far refused to take them home.

846 Armored Cleric

                                Front


Back


891 Adventuring Cleric 

                               Front 

 
                                Back


As far painting I’m pleased with the armor. Metallics can sometimes be difficult as I’ve found that different brands have different viscosity. This is important because you can’t thin metallic paint without losing it’s metallic quality. So far I’ve found that for my painting style, Army Painter metallics have the perfect viscosity without thinning. The other thing that I’m very pleased with is my growing use of glazes. I painted the the shafts of their maces with Vallejo 72.034 Bonewhite (“real” artists would call buff? I will forever refer to it as Bleached Bone), then glazed with burnt sienna ink. And the shadows of the cloaks were glazed with Reaper 09038 Rainy Grey after painting them white. The cloaks are something that I will use again as it makes these goody goods look good!
The rope on the Adventuring Cleric was a real pain to paint as Julie got a little too fine with the detail. I shouldn’t complain though as these are some very nicely sculpted miniatures that in my opinion can hold their own against any others.

I realized after taking these pictures that I hadn’t finished the rims of the bases. After that they will surely see some action against the evil undead!

Friday, February 24, 2023

Da sound of da police - slap chop style

 So I tried my hand at the latest painting style craze that has been sweeping the internet by storm for the last year and a half or so. Slap chop.


A trio of city guard from Reaper Miniatures. Hmm…the results are amateurish at best. How I did it was prime black, dry brush brown, dry brush white, glaze on the colors. Grey was used for the metal parts. They took about 45 minutes each which is really fast for me as I am a slow painter. I don’t plan on using this technique, especially on my vintage Citadel and Grenadier miniatures as I definitely get better results from layering, washes and glazing, etc. The city guard look decent from a couple of feet away which is fine for table top gaming.

Friday, November 25, 2022

Archaic Abodes - wip edition

I don’t normally do work in progress posts, but I figured my blog should have SOME content. I am working on stuff and my little space on the internet is supposed to be documenting it after all. Starting on left bottom and going clockwise we have: farm house, low house, dairy, tavern and water mill.

I have gatehouse and tall house completed. Shack, shed and store are in process too. Santa Clause is going to bring me an airbrush this year so painting should go a lot quicker!

See you soon!


Friday, August 12, 2022

Table set up

 Yeah so, embarrassingly no content over the last like six months? I don’t know how long it’s been. So to get the juices flowing again I got out the table my buddy grim_dark66 made. I threw some terrain and miniatures on it just for the fun of taking a picture.

I ran out of day light so this was the only usable pic I got. There are some miniature and buildings that have not been featured on the blog yet so they will be coming up soon.

More posts soon, I promise.

Sunday, March 6, 2022

Gaslands objective markers

 While out shopping for some specific cars for Gaslands sponsors I came across some Hot Wheels monster truck combo packages at a local Dollar General. They were from 2019 and being a few years old they were tucked away in the back on the discount shelf. Each package came with two monster trucks, a regular car and a smashed car. You can never have too many monster trucks but it was the crushed cars that really peaked my interest. These weren’t just some cheap molded plastic shells but legit hot wheels smashed at the factory and supplied in four bright colors.


Definitely way too bright and shiny for post apocalyptic vehicle mayhem. So out came the washes.


The washes are ones that I made for terrain and are based on the famous Les’ recipe.
I started with black on the bottom chassis and the inside back of the wheels. For the bodies I started out with sepia, then went to burnt umber. I finished off by applying brown and burnt sienna to select areas. I didn’t go too heavy with the weathering as I wanted them to retain some of their brightness and stand out from regular smashed cars.

More Gaslands stuff to come soon!


Saturday, January 22, 2022

More Gaslands cars

 I've been getting into Gaslands again. Even squeezing in a few games. My homie and I did a drag race style game to try to get the basics of the roolz down. He wound up finding the most efficient route through the obstacles and beat me across the finish line. Then my GF graciously humored me and was my opponent for a couple of games of Death Race. The first game she crashed one of her cars into a fuel refinery right out off the starting line then continued to have the most amazing dice rolls for the rest of the game! Me, damn the luck I couldn't role to safe my life. My first car slide off the table and my second car wound up exploding. She whipped me in that one. The second game was a hard fought battle. We crashed, bashed, wiped out, and exchanged much gun fire but still managed to survive (through pure skill!) somehow. Passing the last gate and heading for the finish line I had two Shift Phases of spectacular rolling and blasted across the line for the win. So far me and the GF are 1 and 1.

Ok, enough of all that.

On to some newly painted cars now:

                                                     Here's a car: Bulldog's 05


Armed with twin machine guns from North Star Military Figures Implements of Carnage One sprue.
https://www.northstarfigures.com/prod.php?prod=14058
The wheels I got off an Etsy vendor. I can't remember who, but I bought a bunch of different sizes and use them on almost all of my builds. The armor on the front and back windows is plastic mesh canvas meant for some sort of needle point crafting. The side windows are cheap wire mesh.

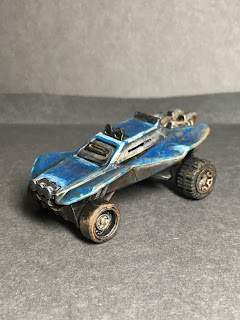
Here's another car: The Shaggin' Wagon

Once again, used the after market wheels from Etsy and cheap wire mesh in most of the windows. I re-enforced the front and rear bumpers with some plastic rod. Armor plates made of thin plastic sheet were added to the sides, hood and front window. Plasticard was glued to the roof, then topped with a twin rocket launcher from Ramshackle Games 20mm Conversion Set.
 https://shop.ramshacklegames.co.uk/toy-car-scale-range/10-20mm-Conversion-Set.html

How's about a buggy: Flippy

Not really a whole lot to this buggy. I did cover the windows with thin plastic card for an Extra Armor upgrade.

And a third car (?): Bullet Tooth Farm Boy

I had a lot of fun with this one. The original Hot Wheels car was so hideously ugly, I wasn't sure what I was going to do with it. I did like the twin engines sticking out of the hood so it did have some potential. I cut the wheels off and stuck some tank tracks form a dollar store anti aircraft tank in their place. It was so ridiculous that I thought, "Huh, I might have something here". The round, bulbus driver's cockpit was not going to work so I glued some plastic bits to it to angle it up. I fabbed some exhaust pipes from copper rod and plastic tubing. The front and rear re-enforcement plates and turret mounted mini gun are from Ramshackle Games. I did add a muzzle to the mini gun to give it a little pizazz. This car is so over the top goofy that it's cool!

Painting:
The Shaggin' Wagon was the only one of this group to have it's OG paint stripped. The other three I just painted over the factory paint job. Bulldog's 05 had a cool 1970's redneck stockcar theme going and I wanted remnants to remain. Bullet Tooth Farm Boy and Bulldog's 05 got a good scuffing from an emery stick. Shaggin' Wagon and Flippy were painted with Vallejo blues in a fast, rough style. All the plastic and resin bits got a coat of Vallejo White Primer 72002. Reaper Pure Black 09037 was then put over the primer. This is a very flat black and works great for this application. For all Reaper paints remember to add a few drops of special sauce and a shaker ball to the bottle before using. (Special sauce is 1 part Flow Improver, 1 part retarder (Slo-Dri) and 8 parts water.) All metal parts were painted Reaper Honed Steel 09053 then highlighted with Reaper True Silver 09207. I dry brushed the Pure Black anywhere I wanted bare metal or weathering to be. Then I sponged Apple Barrel 20432E Nutmeg, concentrating on the lower part of the car, behind the wheels and sometimes the front, for the road grime. Then applied a Sepia wash to the whole car. After that dried, I came back in with another sponging of Nutmeg. To finish them off I came in with a selective placement Burnt Umber wash to brown out certain areas and add some depth. All washes were mixed with some glazing medium on my wet pallet before being applied. 

One final note:
Boogie on over and visit

 Curtis Fell over at 
https://ramshacklegames.co.uk/

And

 Nick Eyre over at
https://www.northstarfigures.com/

Throw some money at them, they have cool stuff. (I am in no way sponsored, paid or otherwise compensated for these endorsements. They just good peeps and I'm sure they would like your business)


Gaslands terrain

 I like to pop into my local dollar store every now and then to see if there is anything new that I can use gaming projects. Some crap found...