I've been getting into Gaslands again. Even squeezing in a few games. My homie and I did a drag race style game to try to get the basics of the roolz down. He wound up finding the most efficient route through the obstacles and beat me across the finish line. Then my GF graciously humored me and was my opponent for a couple of games of Death Race. The first game she crashed one of her cars into a fuel refinery right out off the starting line then continued to have the most amazing dice rolls for the rest of the game! Me, damn the luck I couldn't role to safe my life. My first car slide off the table and my second car wound up exploding. She whipped me in that one. The second game was a hard fought battle. We crashed, bashed, wiped out, and exchanged much gun fire but still managed to survive (through pure skill!) somehow. Passing the last gate and heading for the finish line I had two Shift Phases of spectacular rolling and blasted across the line for the win. So far me and the GF are 1 and 1.
Ok, enough of all that.
On to some newly painted cars now:
Here's a car: Bulldog's 05

Armed with twin machine guns from North Star Military Figures Implements of Carnage One sprue.
https://www.northstarfigures.com/prod.php?prod=14058
The wheels I got off an Etsy vendor. I can't remember who, but I bought a bunch of different sizes and use them on almost all of my builds. The armor on the front and back windows is plastic mesh canvas meant for some sort of needle point crafting. The side windows are cheap wire mesh.
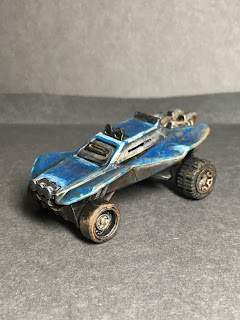
Here's another car: The Shaggin' Wagon
Once again, used the after market wheels from Etsy and cheap wire mesh in most of the windows. I re-enforced the front and rear bumpers with some plastic rod. Armor plates made of thin plastic sheet were added to the sides, hood and front window. Plasticard was glued to the roof, then topped with a twin rocket launcher from Ramshackle Games 20mm Conversion Set.
https://shop.ramshacklegames.co.uk/toy-car-scale-range/10-20mm-Conversion-Set.html
How's about a buggy: Flippy
Not really a whole lot to this buggy. I did cover the windows with thin plastic card for an Extra Armor upgrade.
And a third car (?): Bullet Tooth Farm Boy
I had a lot of fun with this one. The original Hot Wheels car was so hideously ugly, I wasn't sure what I was going to do with it. I did like the twin engines sticking out of the hood so it did have some potential. I cut the wheels off and stuck some tank tracks form a dollar store anti aircraft tank in their place. It was so ridiculous that I thought, "Huh, I might have something here". The round, bulbus driver's cockpit was not going to work so I glued some plastic bits to it to angle it up. I fabbed some exhaust pipes from copper rod and plastic tubing. The front and rear re-enforcement plates and turret mounted mini gun are from Ramshackle Games. I did add a muzzle to the mini gun to give it a little pizazz. This car is so over the top goofy that it's cool!
Painting:
The Shaggin' Wagon was the only one of this group to have it's OG paint stripped. The other three I just painted over the factory paint job. Bulldog's 05 had a cool 1970's redneck stockcar theme going and I wanted remnants to remain. Bullet Tooth Farm Boy and Bulldog's 05 got a good scuffing from an emery stick. Shaggin' Wagon and Flippy were painted with Vallejo blues in a fast, rough style. All the plastic and resin bits got a coat of Vallejo White Primer 72002. Reaper Pure Black 09037 was then put over the primer. This is a very flat black and works great for this application. For all Reaper paints remember to add a few drops of special sauce and a shaker ball to the bottle before using. (Special sauce is 1 part Flow Improver, 1 part retarder (Slo-Dri) and 8 parts water.) All metal parts were painted Reaper Honed Steel 09053 then highlighted with Reaper True Silver 09207. I dry brushed the Pure Black anywhere I wanted bare metal or weathering to be. Then I sponged Apple Barrel 20432E Nutmeg, concentrating on the lower part of the car, behind the wheels and sometimes the front, for the road grime. Then applied a Sepia wash to the whole car. After that dried, I came back in with another sponging of Nutmeg. To finish them off I came in with a selective placement Burnt Umber wash to brown out certain areas and add some depth. All washes were mixed with some glazing medium on my wet pallet before being applied.
One final note:
Boogie on over and visit
Curtis Fell over at
https://ramshacklegames.co.uk/
And
Nick Eyre over at
https://www.northstarfigures.com/
Throw some money at them, they have cool stuff. (I am in no way sponsored, paid or otherwise compensated for these endorsements. They just good peeps and I'm sure they would like your business)


No comments:
Post a Comment