Greetings and welcome to my contribution to Deadcember! Me friend left his game board at my house so I thought I would utilize his graveyard for the group shot of my freshly painted Wights.
Now on to the individual shots. I have to state that these guys where extremely hard to get decent pictures of. I’m blaming: 1) I’m not great at taking pictures to begin with. 2) the natural sunlight combined with the Nihilakh Oxide Citadel paint and pure white highlights. The camera had a hard time focusing on especially the faces. I may try taking pics again with artificial light to see if that is better.
Ok, enough excuses, on to the miniatures themselves.
First up I've got a Citadel Lord of the Rings Barrow Wight B from ME-73.
front
back
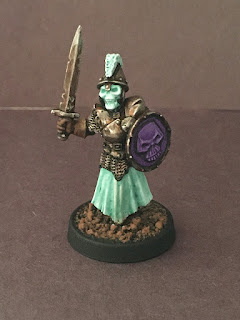
Next up is a Marauder Wight B from the MM51 Undead Characters.
front
back
Last up is another Wight from the MM-51 series this time Wight A
front
back
The Marauder Wights actually have Marauder shields thanks to a generous friend who gave me a sprue of old Marauder shields a while back.
On to the painting. The ghostly parts were primed white then painted with GW Nihilakh Oxide and edge highlighted with Vallejo Pure White. This was the first time I used the Nihilakh Oxide and it turned out pretty descent in real life, the pictures just don't do it justice. It has a real nice glow effect. These miniatures represent a transitional period were I started getting into using glazes. The armor was base coated with black then painted with Army Painter Plate Mail Metal and highlighted with Army Painter Shining Silver (I know a lot of people poopoo on Army Painter paints but their metallic paints have the best viscosity for my style, and you gots to roll with what works for you). When the metal was dry I glazed it with brown and black inks to try and give it a rusty look. The purple spot color was Vallejo Model Color Blue Violet glazed with Vallejo Game Color Hexed Lichen for the medium shades, then some violet ink glazed into the deep shadows. The gloves on A and B were painted with P3 Boot Strap Leather glazed with GW Agrax Earth Sade. The pouch on B and the shaft on A's polearm shaft were base coated in P3 'Jack Bone and then glazed with P3 Boot Strap Leather.
I plan on trying to keep up with this "how I painted this miniature" thing for as long as I can. I like it when I've seen it in other blogs, at least for me it is inspirational. But sometimes in the heat of wet pallet painting it may be hard to recall what colors did what.
Thanks again for stopping by. Be strange but don't be a stranger!